Sending From an Alias in a Shared Mailbox (Microsoft 365)
To send replies from a shared mailbox's alias — sales@, invoices@ — instead of its main address, setup has
two halves. An admin turns on sending from aliases for the tenant and grants Send as on the mailbox.
Anyone with access then opens the shared mailbox in its own browser tab, ticks the alias under Settings → Mail
→ Compose → Addresses to send from, and sets the From address on each reply. If the alias isn't in the
From dropdown — which is normal for shared mailboxes, even fully configured — use Other email address…
and type it.
This article covers Microsoft 365 / Exchange Online shared mailboxes only. Gmail shared inboxes use a different mechanism — contact support for help with those.
The permission error this solves
Sending from an alias before setup is complete typically fails with:
You do not have the permission to send the message on behalf of the specified user (0x80070005)
The same root cause shows up in other ways too:
- the reply leaves with the mailbox's primary address instead of the alias
- the message delivers internally but bounces to external recipients
- the alias never appears in the From dropdown
How sending from an alias works
A shared mailbox can carry several addresses — info@, sales@, invoices@. Microsoft treats only the primary
one as a real sending address until aliases are explicitly turned on. Until then, sending from invoices@ is
read as sending on behalf of the mailbox — a different permission, which is why the error above appears.
Consider a generic display name if the mailbox sends from more than one alias. The display name is a property of the mailbox itself, shared across every alias — Microsoft doesn't let you set a different one per alias. If it's set to something like "Support" but the mailbox also sends as
sales@orinvoices@, recipients see "Support" on those replies too. Something neutral like "YourCompany Team" reads naturally no matter which alias sent the message.
Track 1 — Mailbox admin (one-time, per tenant)
All of Track 1 happens in the Exchange admin center — the tenant-wide toggle, the mailbox's aliases, and its Send as / Full Access permissions. Shared mailboxes also show up under Teams & groups → Shared mailboxes in the Microsoft 365 admin center, and it's tempting to manage aliases from there instead, but don't: that screen's Aliases field expects the mailbox to carry an active user license. Shared mailboxes are unlicensed by default, so an alias added from the Microsoft 365 admin center can silently fail to take effect. Use the Exchange admin center for the whole track.
-
Turn on sending from aliases (Exchange admin center): go to Settings → Mail flow, tick Turn on sending from aliases, then Save. It sits directly under Turn off plus addressing in the same panel, and it's off by default. This is a tenant-wide switch, not a per-mailbox one.
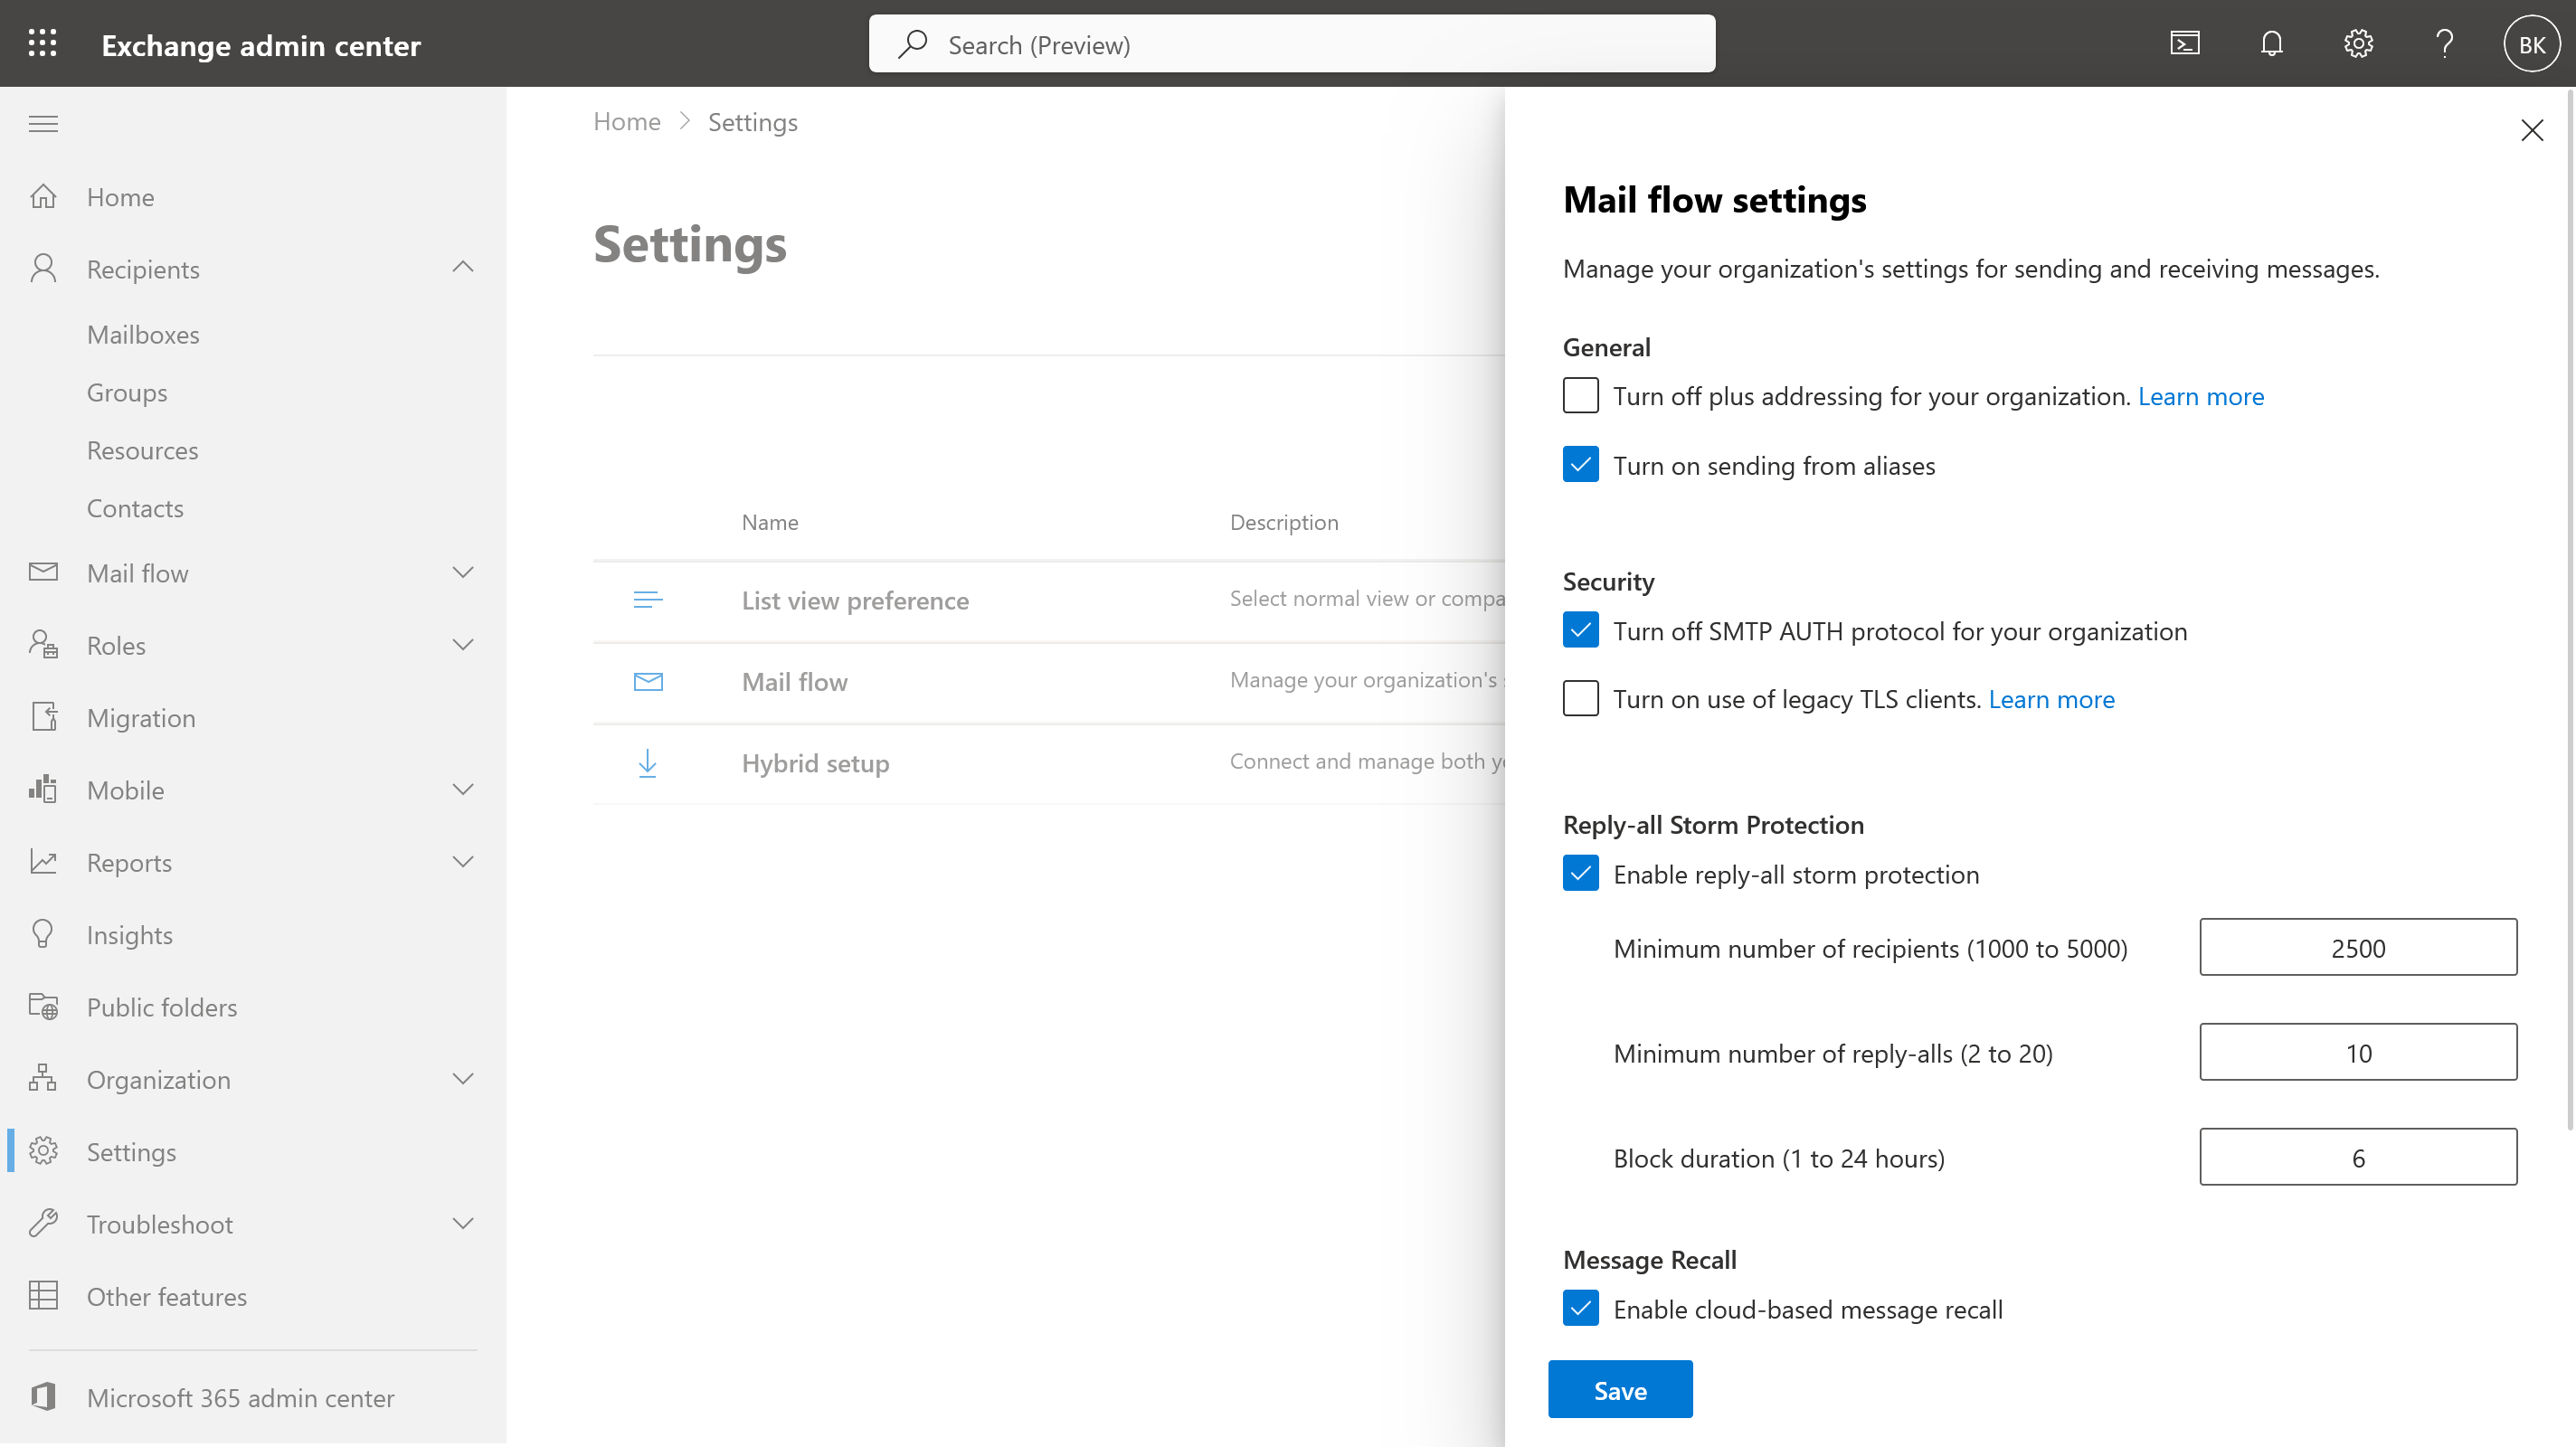
PowerShell equivalent, for admins who prefer it:
Set-OrganizationConfig -SendFromAliasEnabled $trueWait before testing. This change takes anywhere from 5 minutes to an hour to propagate. Most "it still doesn't work" reports are a test run too early.
-
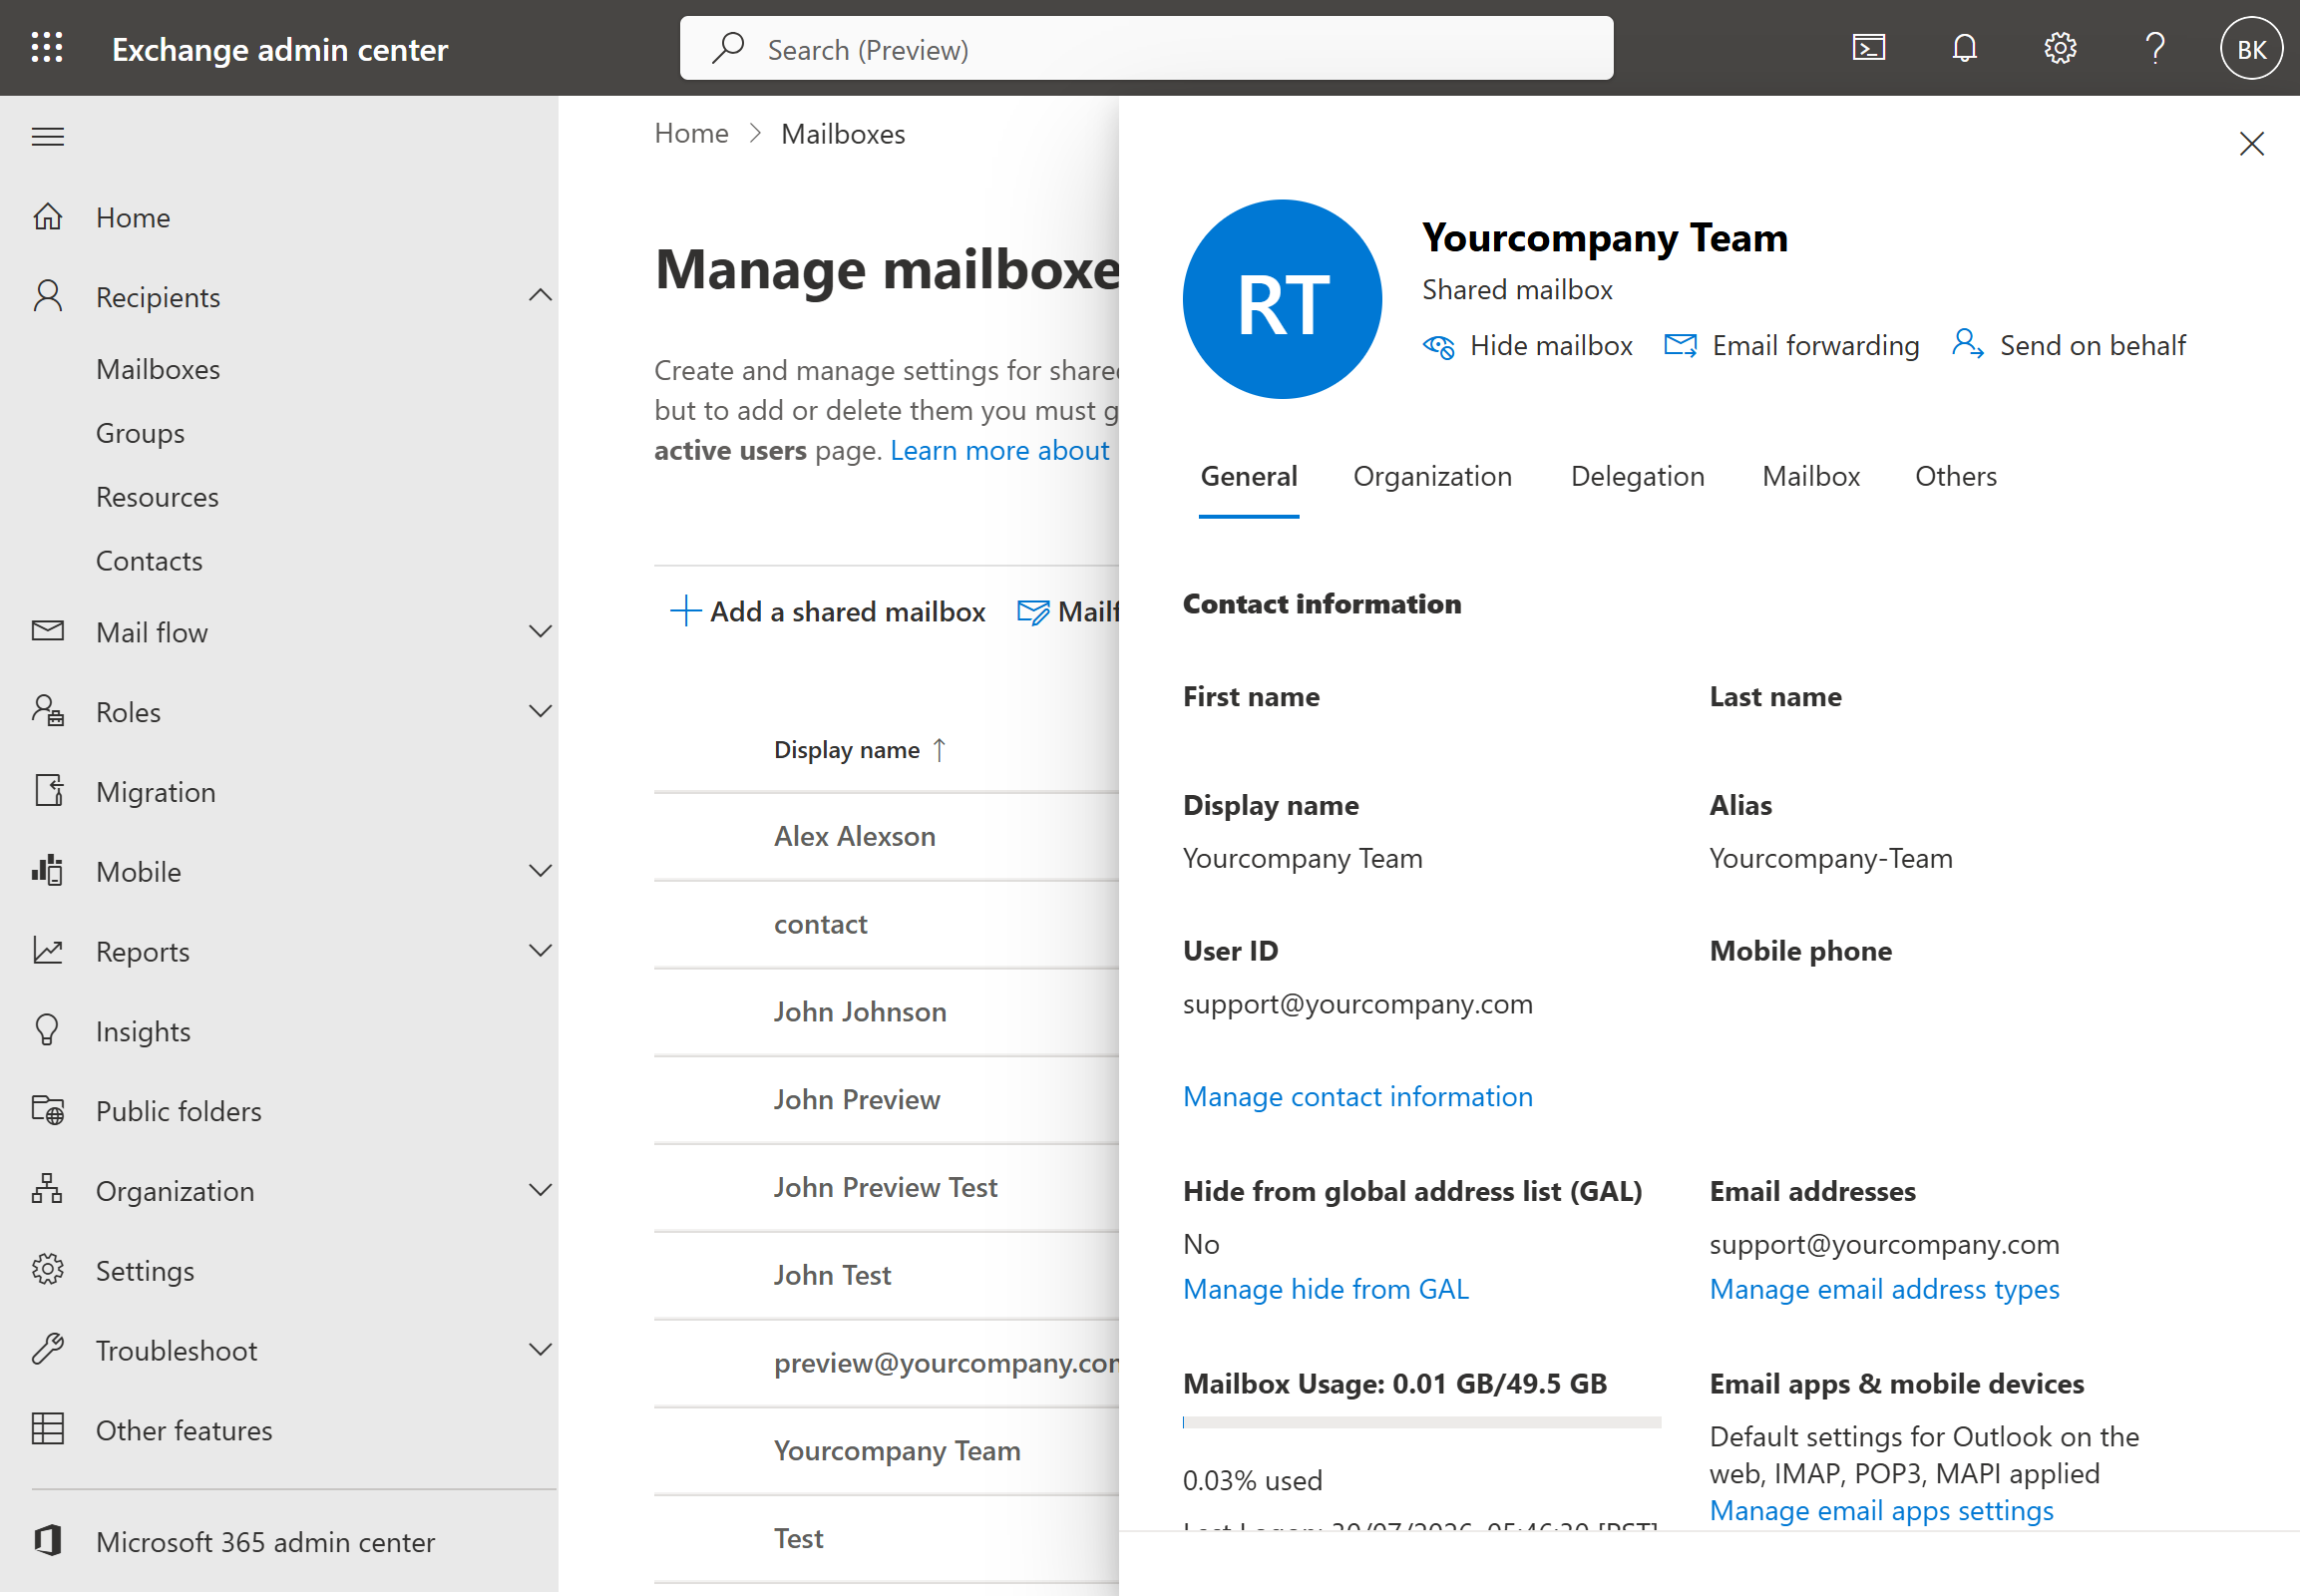
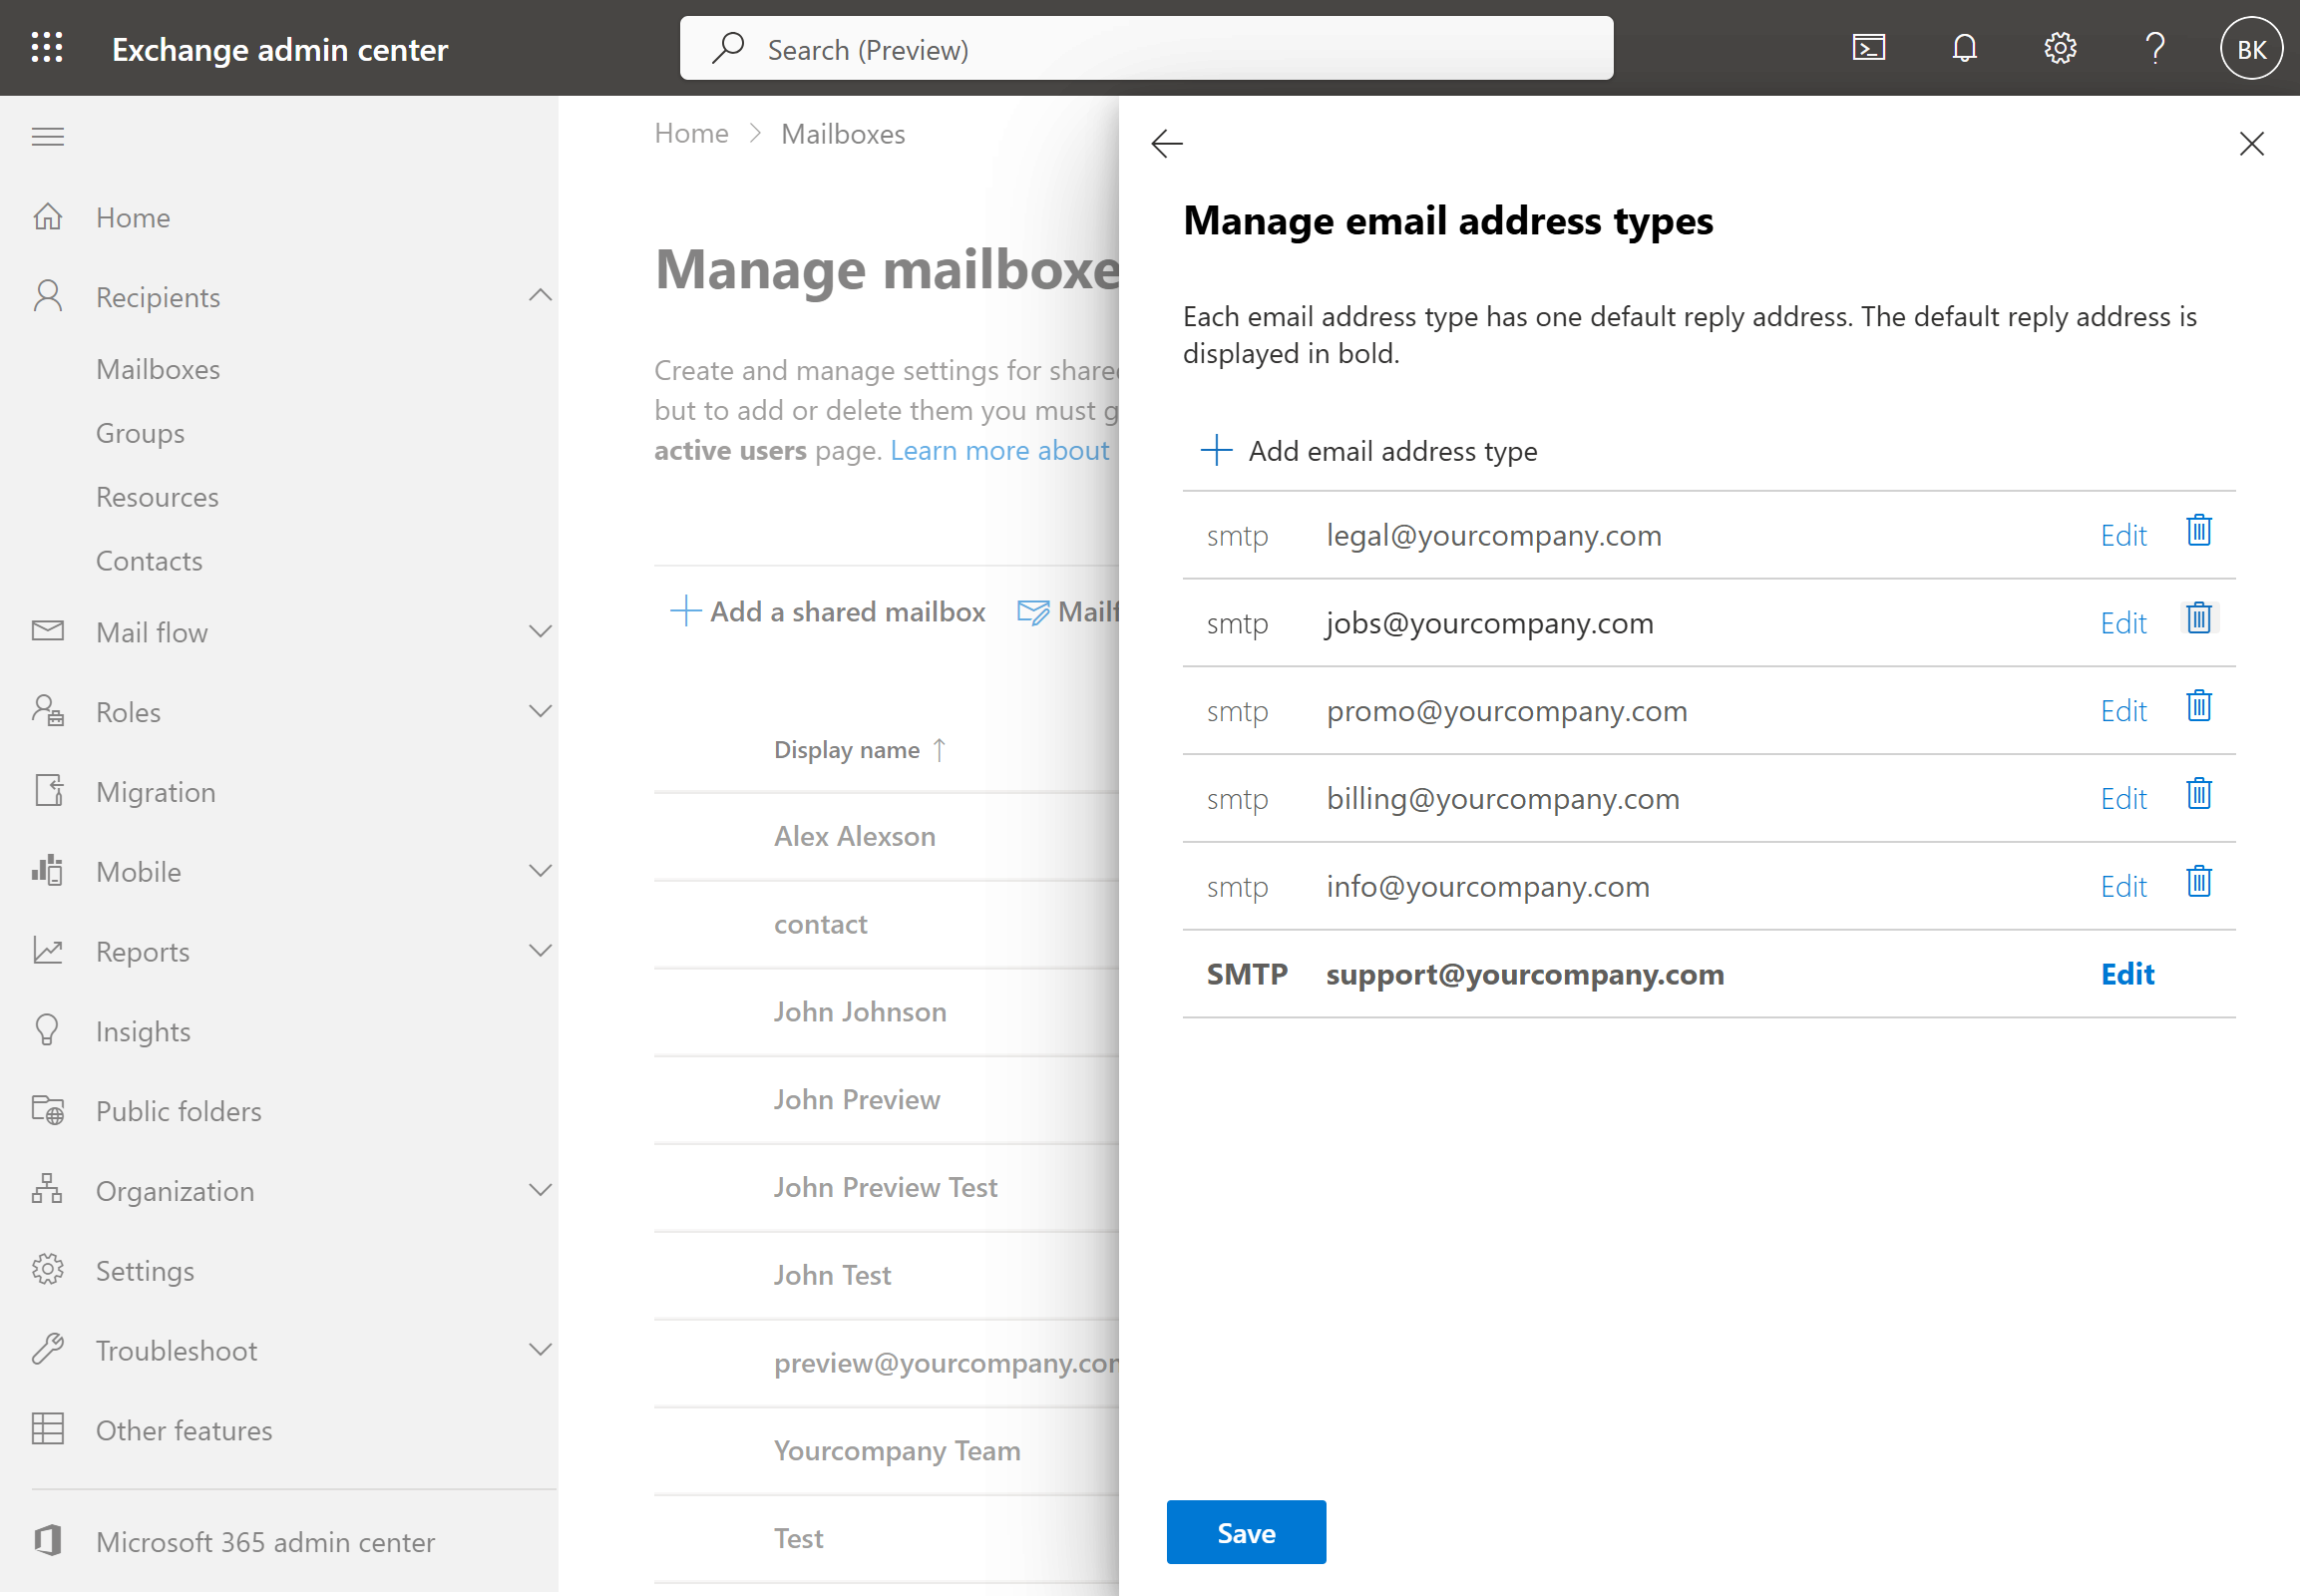
Create the aliases on the shared mailbox (Exchange admin center): go to Recipients → Mailboxes, select the shared mailbox, and open its General tab. Under Email addresses, click Manage email address types to see every SMTP address on the mailbox, and Add email address type to add a new one. The alias has to be added on this mailbox; an address that lives on a different mailbox or a distribution group won't work.
-
Grant Send as and Full Access, not Send on behalf of (Exchange admin center): same mailbox, open the Delegation tab. It shows Send as and Read and manage (Full Access) summary cards, each with its own Edit button — there's no Send on behalf of option here, which is deliberate.
Permission Why it's needed Without it Read and manage (Full Access) Opens the shared mailbox in its own tab in Outlook on the web, which Track 2 depends on Track 2 is impossible — there's no way to reach the mailbox's own settings Send as Lets the person send as the mailbox and its aliases The 0x80070005 permission error 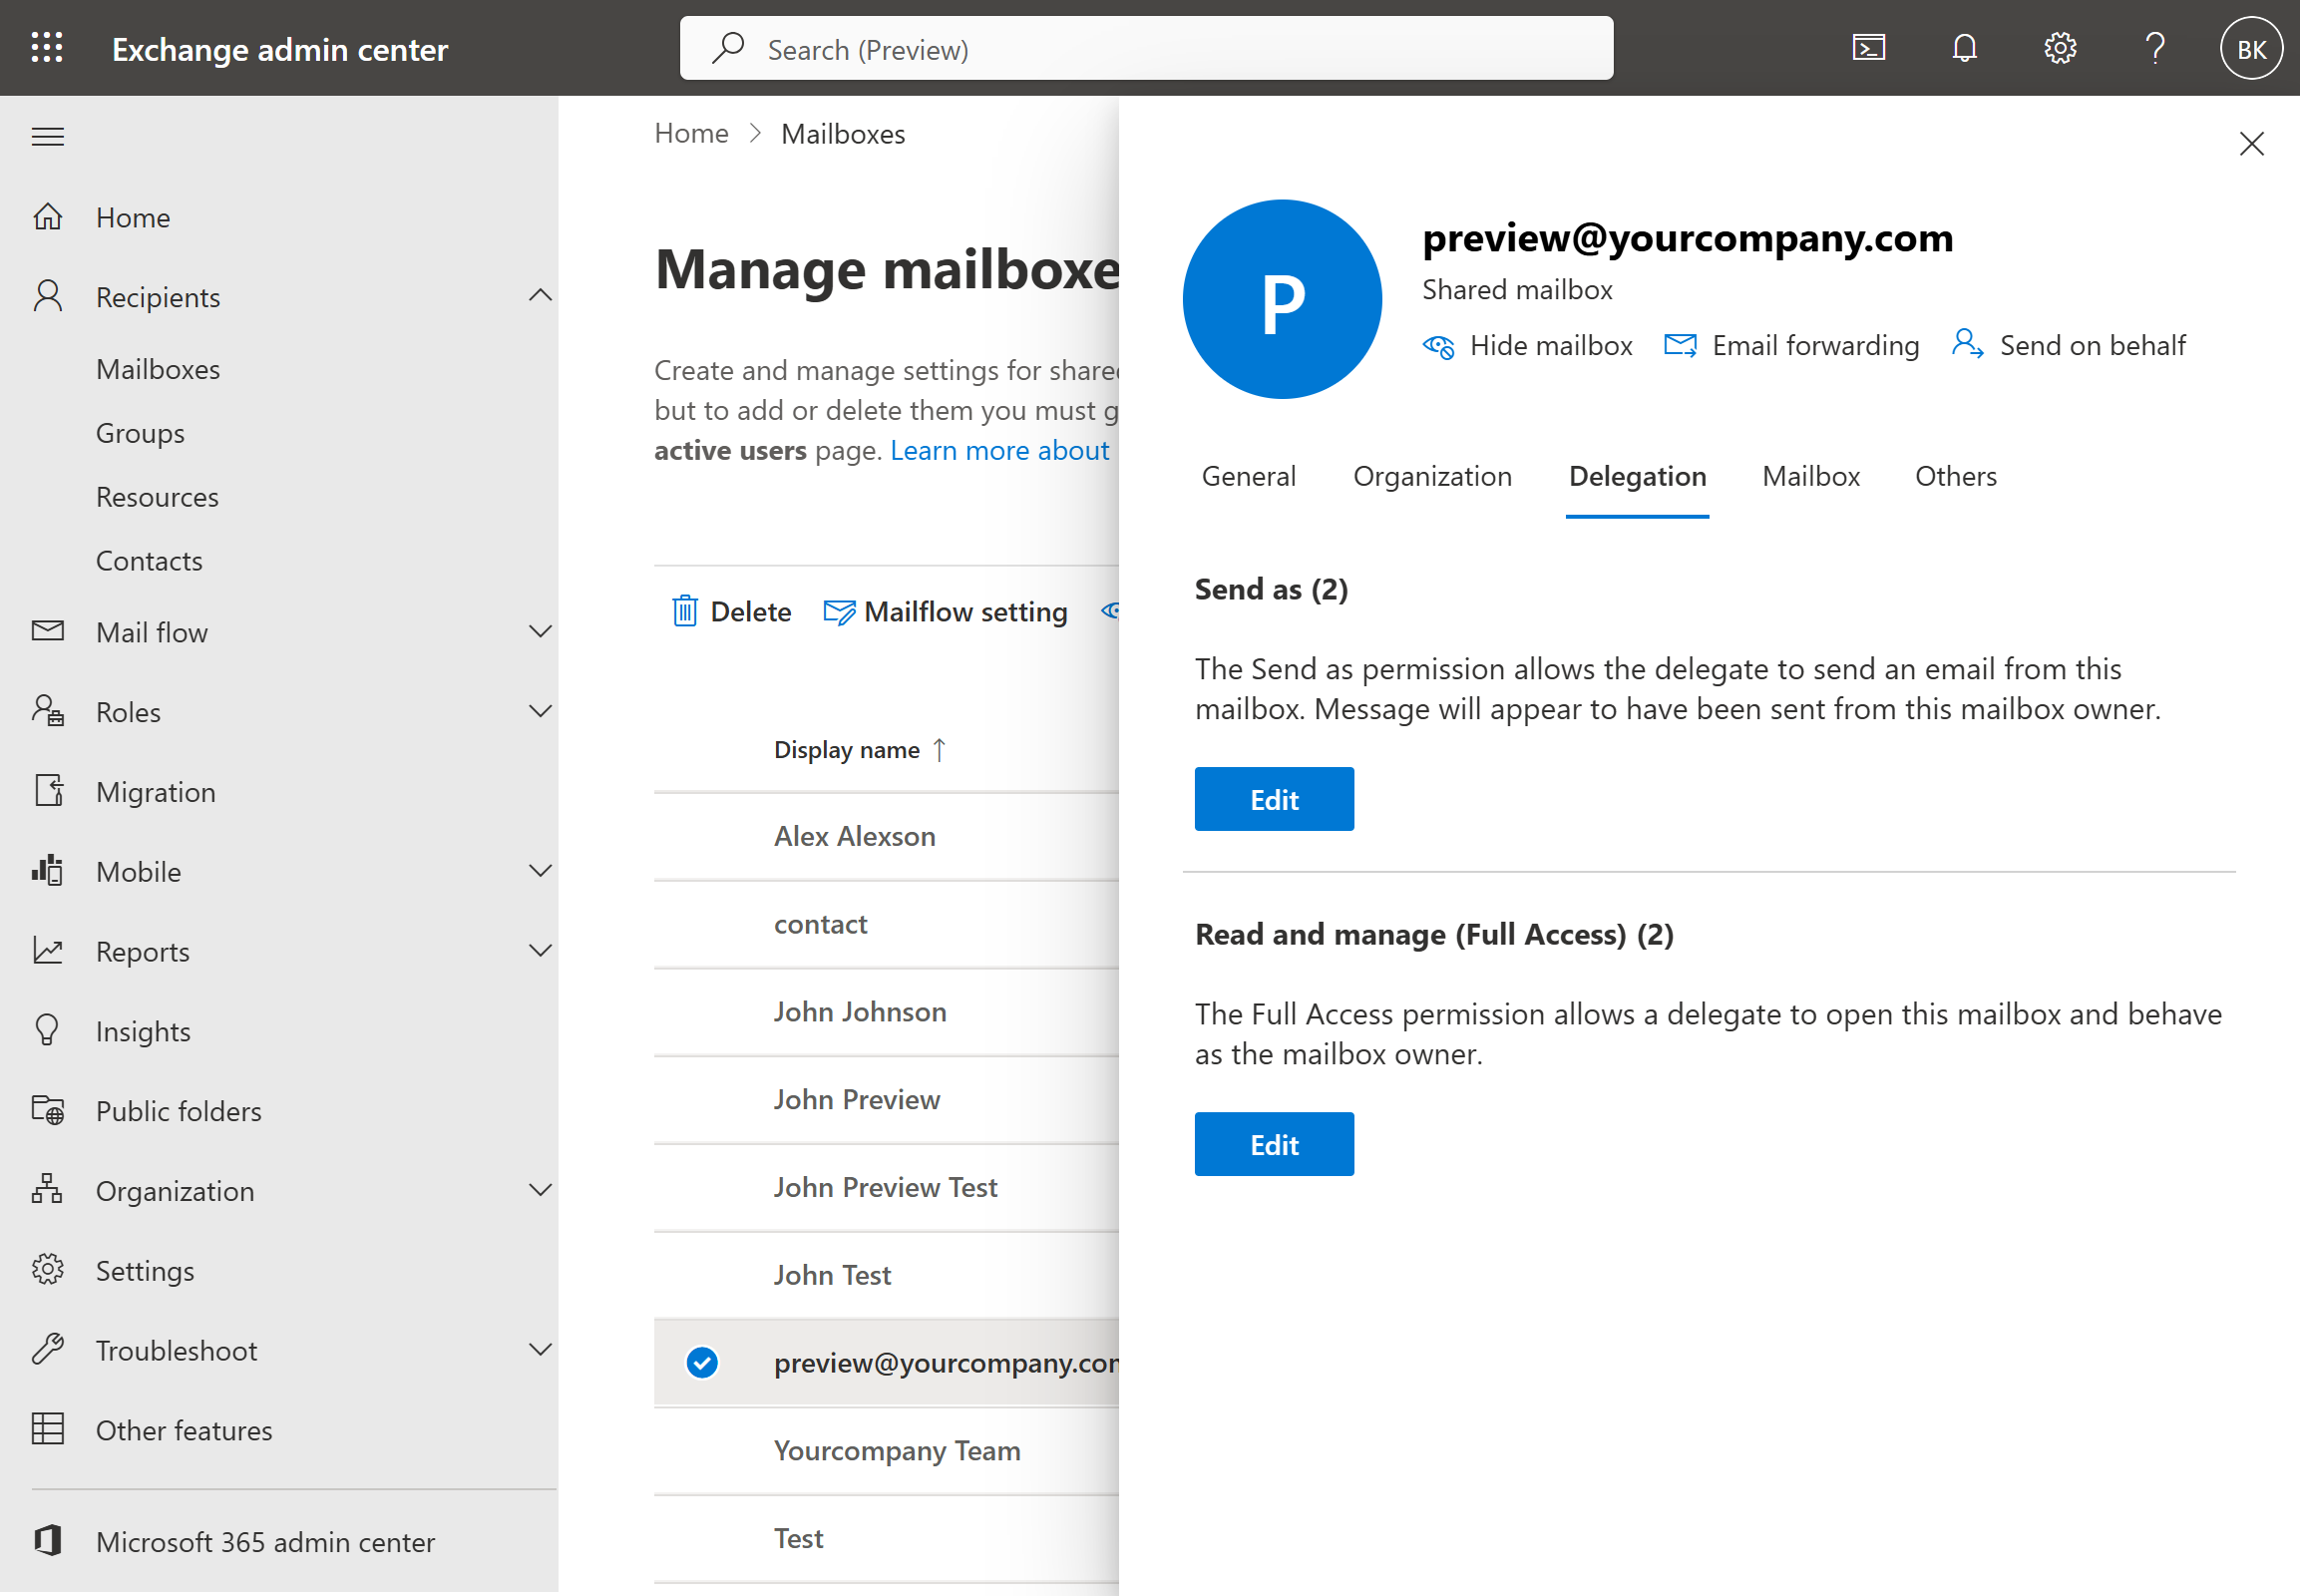
Click Edit on Send as, then Add members, search for and tick the user, and confirm.
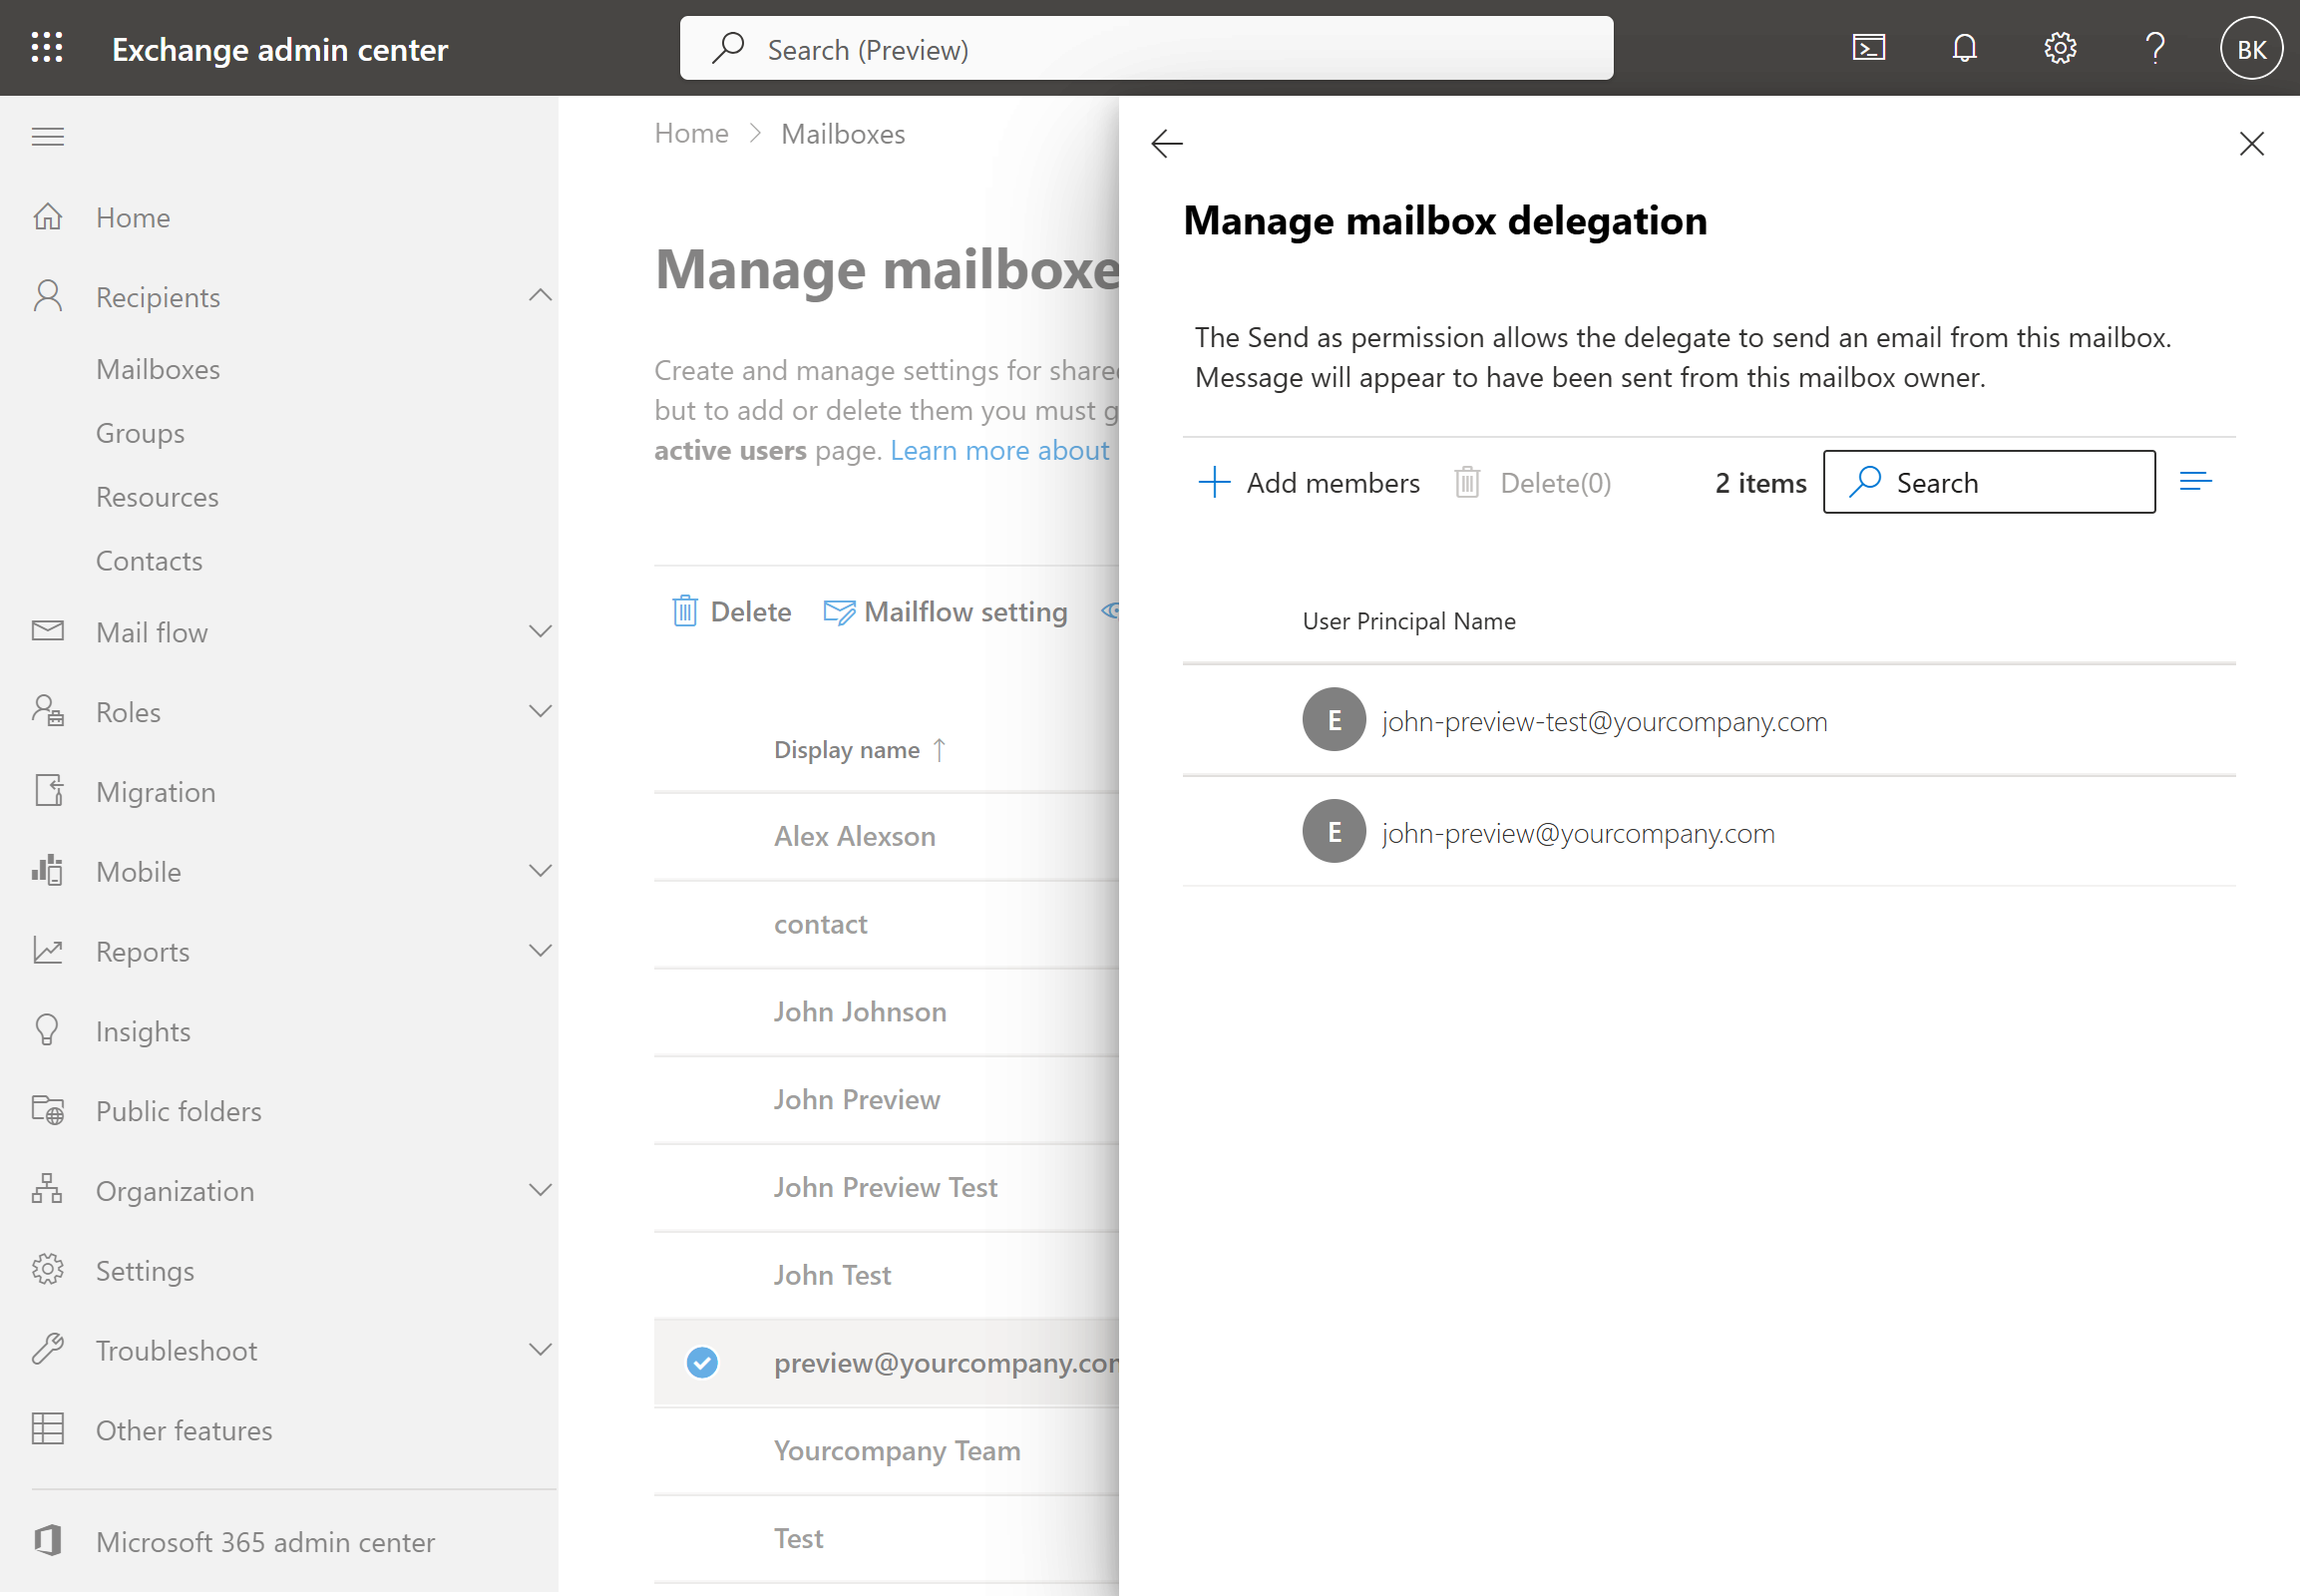
Repeat on Read and manage (Full Access) for anyone who also needs to open the mailbox directly in Track 2.
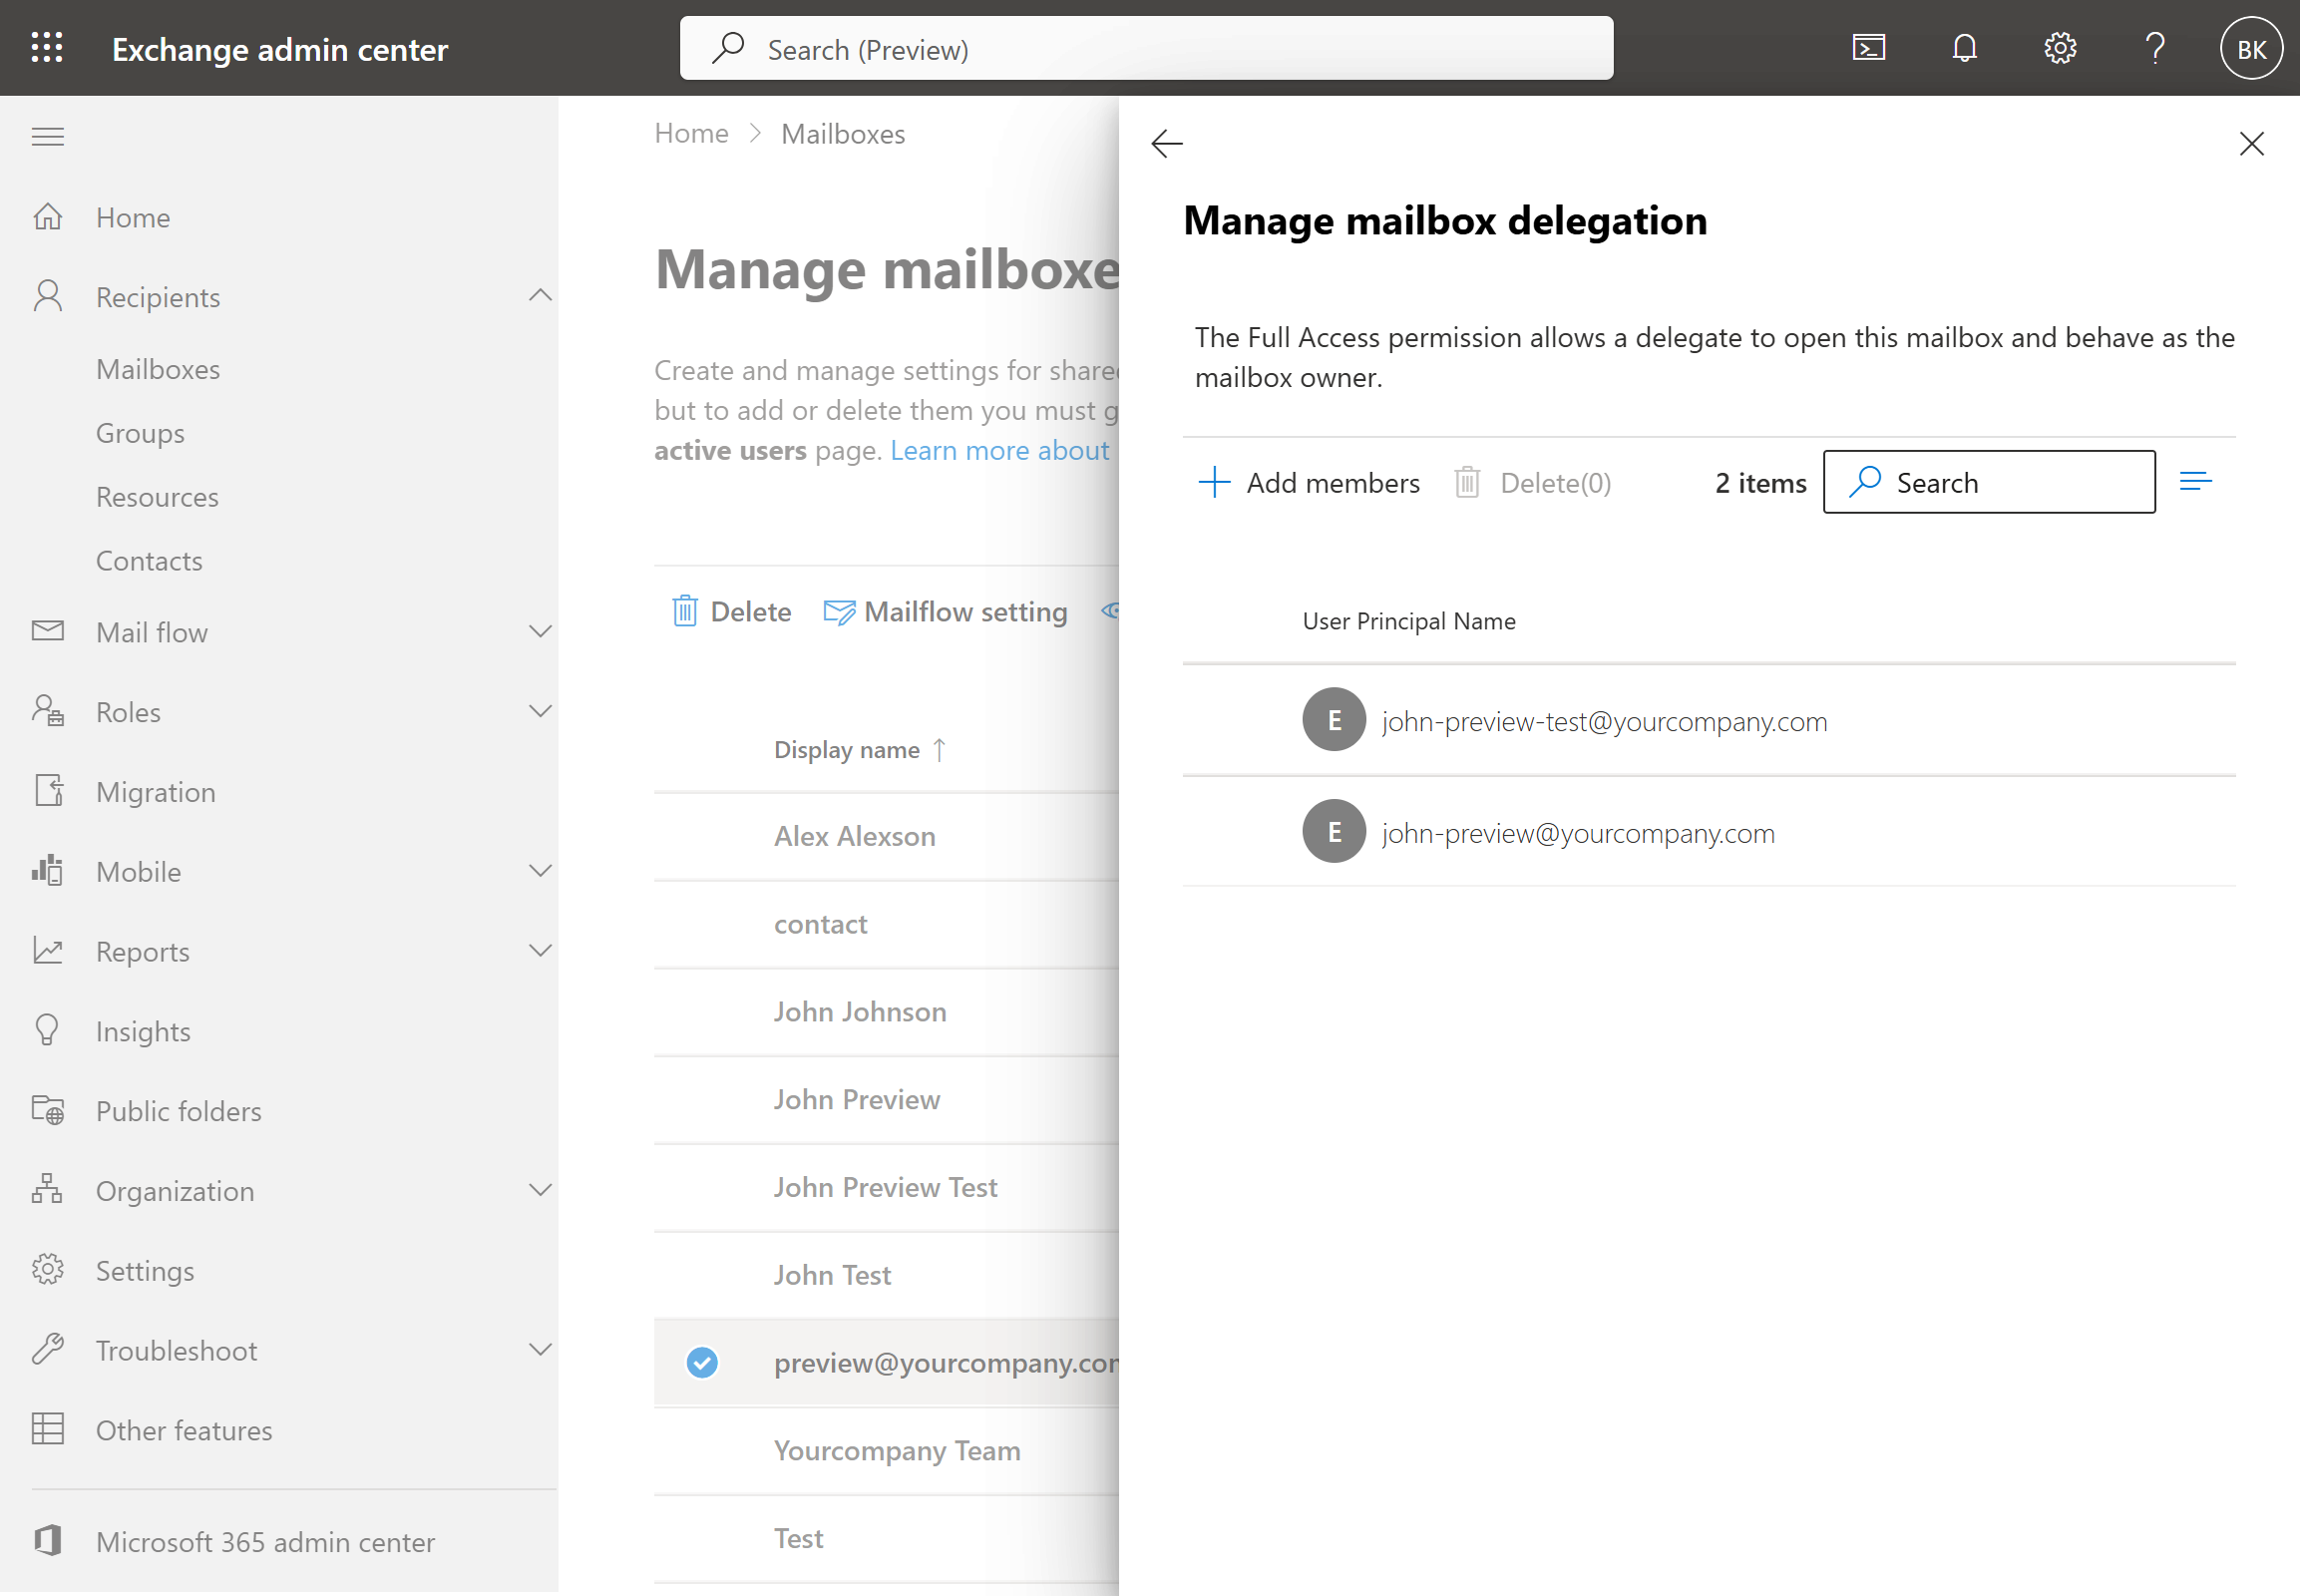
Send on behalf of is not a substitute for Send as. It produces exactly the 0x80070005 error this article is about.
-
Set the addresses to send from, once, for everyone: the Addresses to send from list (Track 2, step 3) is a property of the shared mailbox itself, not of each user. An admin with Full Access can complete Track 2's setup once, centrally, and every delegate inherits it — send users straight to Track 2, step 4 afterward.






Track 2 — Mailbox user (per shared mailbox)
-
Open the shared mailbox as its own mailbox in Outlook on the web. Two ways: click your profile picture, top right, then Open another mailbox and type the shared mailbox's address — or go straight to
https://outlook.office.com/mail/shared@yourdomain.com/.This part matters. The shared mailbox must open in its own browser tab or window. If you work with it as a folder nested under your personal mailbox, the settings below aren't reachable and any alias you type reverts silently to the primary address.
-
Open the compose settings: gear icon → View all Outlook settings (if prompted) → Mail → Compose. Older builds label this Compose and reply.
-
Tick the aliases under "Addresses to send from": every SMTP address on the mailbox is listed, with the primary one already selected. Tick each alias the team sends from —
invoices@,notifications@,updates@— then Save. The list can take a second or two to render; if it looks empty at first, wait rather than assuming the section is missing. While here, also turn on Always show From so the sending address stays visible on every draft.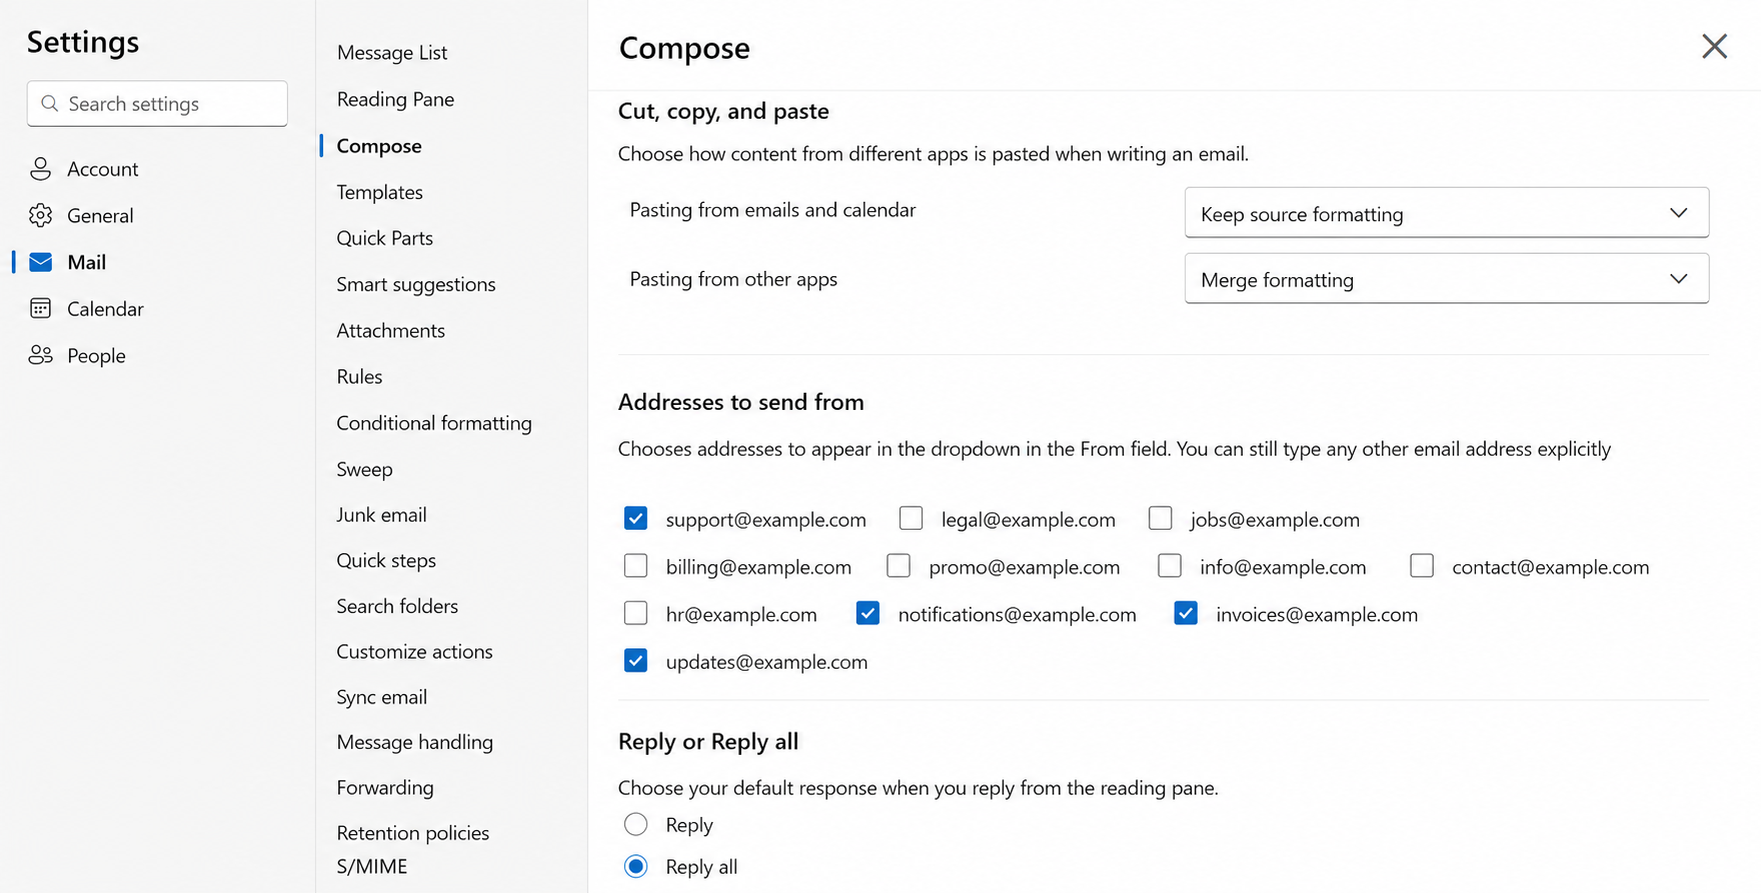
-
Send: open a draft and click the From field. If the alias is listed, select it and send. If it isn't — which is common, even with the boxes ticked:
- Click From, then Other email address…
- Type the full alias
- Don't accept the autocomplete suggestion — confirm with Use this address (or press
Escon older builds) - Check the field again before sending. The full alias should still be visible; if it collapsed into the mailbox's display name, clear it and start over
This is usually a one-time step per alias. Once an alias has sent successfully, it typically appears in the From dropdown from then on, and the manual Other email address… path above isn't needed again.
This is expected, not a misconfiguration. Even with the tenant setting on, Send as granted, and every alias ticked, the From dropdown can still offer only the primary address plus Other email address…. Shared mailboxes never received full proxy-address support from Microsoft, so the manual path above is the normal route — not a workaround for something broken.
Known limitations
This works reliably only in Outlook on the web, with the shared mailbox opened directly — not as a folder under your own inbox. Classic Outlook for Windows doesn't support it: sending from an alias fails there with the same permission error even when everything above is set up correctly. Other clients (new Outlook, Outlook for Mac, mobile) are untested — if yours behaves differently, trust what you observe over this page. It's also not an officially supported Microsoft feature, so behavior can vary by tenant and may change over time.
Troubleshooting
| Symptom | Likely cause | Fix |
|---|---|---|
| "You do not have the permission to send the message on behalf of the specified user" | Missing Send as, or sending from a desktop client | Grant Send as; send from Outlook on the web |
| Alias missing from the From dropdown | Tenant setting off, or alias not ticked | Track 1, step 1, then Track 2, step 3 |
| Alias reverts to the primary address while typing | Autocomplete resolved the address | Retype the full alias, confirm with Use this address |
| Recipient sees the primary address | Setup incomplete, or an unsupported client was used | Re-check both tracks; verify in Outlook on the web |
| Settings page shows no "Addresses to send from" | Mailbox opened as a folder, or no Full Access | Open the shared mailbox directly; request Full Access |
| Section is there but the checkbox list is blank | The list renders a second or two late | Wait, or reload the settings page |
| Aliases ticked and saved, but the From dropdown shows only the primary address plus "Other email address…" | Expected behavior for shared mailboxes, even fully configured | Use the manual path in Track 2, step 4 — no admin action needed |
| Manual path also fails with the permission error | Missing Send as, or the tenant toggle is off | Admin: verify both, Track 1, steps 1 and 3 |
| Everything looks right, still fails | Change hasn't propagated yet | Wait up to an hour, then retest |
Working with ReplyFabric
- ReplyFabric prepares the draft; the send happens through Outlook. If an alias isn't enabled yet, the draft itself is correct and the send still fails — configure the alias once, using the steps above, and the error disappears for every future reply from that address.
- Human-in-the-Loop is unaffected. You still review, edit, and approve every draft before it goes out, regardless of which address it sends from.
- ReplyFabric mailbox access is separate from Exchange permissions. Assigning a mailbox to a teammate in ReplyFabric doesn't grant Full Access or Send as in Microsoft 365 — both still need to be set up directly in Exchange/Microsoft 365, per Track 1 above.
- If a category is set up to route to a specific address — invoices to
invoices@, careers tocareers@— enable that alias before go-live so approved replies actually leave from the right address. See Category Management: Email Address Routing.
What's next
- Connecting Microsoft 365 Shared Mailboxes — connect the shared mailbox itself, if that hasn't happened yet.
- Mailbox Settings: General — a separate, inbound-facing Alias Routing toggle that assigns incoming mail by recipient alias to a category. Don't confuse it with the outbound Send as setup on this page.
- Category Management: Email Address Routing — route categories to the aliases enabled here.